Table of Contents
Cutting railway sleepers for construction and landscaping projects is a common task for a variety of users, from DIY enthusiasts to professional tradesmen and those directed by architects. Each group has different needs, tools and skill levels, but safety and precision are key for all involved.
Understanding the Basics
Safety First:
Before diving into the cutting process, it’s crucial to address safety, particularly under the New Zealand Health & Safety at Work Act, even if you are at home. Always wear appropriate personal protective equipment (PPE) regardless of your level of expertise.
- Safety glasses to protect eyes from sawdust and debris.
- Ear protection due to the high noise levels of cutting equipment.
- Dust mask or respirator, especially if the sleeper has been historically treated.
- Sturdy gloves to protect hands from splinters and cuts.
- Steel-toed boots for foot protection.
- See our brief grading and handling guide here.

1. Structural Integrity
Choosing the right sleeper, of the right quality is necessary if one is intending on cutting or adapting. Most landscaping sleepers are graded as a whole sleeper and does not include considerations around cutability. Generally, a much higher quality sleeper is required to ensure minimal wastage. When using rougher, more worn sleepers one will need to allow for greater quantity to cut from.
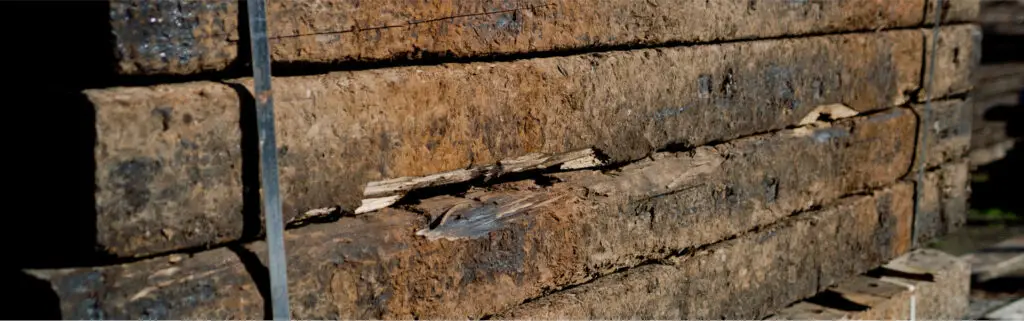
- No Major Cracks or Splits: Check for deep cracks or splits in the wood particularly running longways as these can compromise the strength and stability of the sleeper. Small cracks are typical and add character, but large, deep cracks can make the sleeper unsafe for structural use and will likely split while cutting. ‘Docking’ or cutting the ends of each sleeper can go a long way in tidying the sleeper, and can be beneficial to do when cutting lengthways, particularly if there are cracks/splits at each end.
- Minimal Rot: Ensure the sleeper is free from significant rot. While some surface weathering and decay is expected and often desired for its rustic look, internal rot can weaken the wood, making it unsuitable for cutting and long-term use.
- Adequate quantities, allowing for waste and flexibility: As mentioned above, not all used hardwoods are suited for cutting. When used timbers are cut in half, the durability and general integrity is also halved. Like most construction materials, allowing for wastage, unsuitable lengths, and other rustic characteristics will likely require having more material on hand than what is required. Buying the cheapest, roughest sleeper to then cut in half hoping to double the quantity or linear measure is typically not the wisest strategy for maximising materials and cost efficiency.
2. Wood Hardness and Density
- Hardness: Railway sleepers are typically made from (very) hardwood, such as Oak or Jarrah, which are ideal for enduring outdoor conditions. Ensure the wood hasn’t softened, which can be a sign of rot or excessive moisture exposure. Checking the correct saw blades are used for the timber, or a frequently sharpened chainsaw is used makes a big difference to the time and effort required onsite, and can be the difference between a productive day, or one that is hard on the body and the tools.
- Density: The sleeper should still retain its original density and weight. If it feels unusually light, it might be an indication that the wood has deteriorated internally. Often the density can be felt during cutting, where we should expect continuous resistance to a blade during the cutting motion, rather than hitting pockets of light and brittle wood where the saw can speed up, splutter or get thrown off track. Sometime a good knock on the wood is all we need to compare a sleeper to the rest of the pack.

3. Treatment and Chemicals
- Safety Precautions: If the sleeper has been (preservation) treated when first manufactured, much like the classic NZ (Pine) Sleepers, please use appropriate personal protective equipment (PPE) and cut in well-ventilated areas or with a vacuum. A mask, eye protection and gloves are a minimum, but do also consider the safety of the environment as well; blocking of water drains and keeping away from edible gardens. Residual treatments in saw dust can also kill off grass temporarily. Often running cold water over skin affected by bumps and scratches from a treated timber can soothe and remedy any aggravations. In addition, do also remember that sleepers were made for heavy commercial industry, spending years around grease, oil and other byproducts of the rail network which can affect the cleanliness of the sleeper.
4. General Condition
- Surface Condition: The sleeper should be relatively clean of any debris, moss, or other materials that might obscure its true condition. It is paramount to remove stones, steel and other external contaminants before cutting as this can wreak havoc on sawblades and is generally hazardous. A wire brush as well as a flat head screwdriver with claw hammer can be very useful for clearing out the exposed grains, nooks and crannies.
- Overall Appearance: While aesthetics is usually a matter of personal preference, especially for decorative uses, ensure that the appearance aligns with the intended project outcome before cutting or modifying. Remember, you cannot un-cut timber, so cut less than is needed, and finetune requirements as you get closer to the end.
5. Dryness
- Moisture Content: The sleeper should not be excessively damp. High moisture content can make cutting difficult and may contribute to rapid tool dulling. It can also increase the likelihood of the wood splitting after being cut and can also be a sign the timber or durability factors are jeopardised.
Often leaving a wet sleeper out in the sun for the day is more than enough to dry thoroughly.
Before commencing any cutting, it’s a good idea to do a thorough inspection based on these above criteria. If the sleeper does not meet these conditions, it may be best to select another sleeper type, grade or timber species.
Don’t be shy to ask for a second opinion, or to do a test run on some spare sleepers before committing to the whole process.
Cutting Techniques for Different Users
DIY Enthusiasts
DIYers often use railway sleepers for home projects like garden beds, edging, or simple landscaping features. For these applications, a standard circular saw or a chainsaw is usually sufficient. A handsaw will be a struggle but could be used if time and effort allowed, for minor quantities.
- Tool Advice: A powerful circular saw with a carbide-tipped blade is ideal for making clean cuts through thick sleepers. Knowing how to sharpen a chainsaw (in advance) is very helpful if one is used. Work with your tools, not against.
- Technique Tips: Measure and mark your cut line clearly using a chalk line or marker. Secure the sleeper to ensure it doesn’t move during cutting. Make sure to use steady, even cuts and allow the saw to do the work without forcing it. Be sure to have a clear work area and all necessary PPE before starting.
Tradesmen (Builders, Landscapers)
Professional builders and landscapers might use sleepers for more structured applications like retaining walls, steps, or heavy-duty features, particularly in greater quantities, spans or volumes.
- Tool Advice: A high-power chainsaw or a reciprocating saw with a long, coarse blade is more suitable for frequent or heavy-duty cutting. 18-40V corded power tools tend to be more ideal than battery powered, so a dedicated cutting station can be more efficient to set up when on the bigger jobs.
Some heavy gauge sandpaper can very quickly wipe off burrs around the cut. - Technique Tips: For precise cuts, use a guide rail along with your saw. Regularly check the sharpness of your blades, as blunt tools can lead to inefficient and unsafe cutting practices. If possible, cut off the bulk of the off cut, then use a smaller blade (I.e. circular saw) to do the more refined, finishing cuts.

Architects and Designers
Architects and designers often specify cut sleepers in their designs or project instructions, and cutting may be undertaken before delivery and installation on site. They need to ensure that the cuts are precise for aesthetic and structural reasons, which may be undertaken by sawmills or more commercial processors, which of course, would require a much higher calibre (graded) sleeper.
- Tool Advice: For the most accurate cuts, using a table saw or a track saw can ensure precision. However, these are typically operated by experienced users or professionals. Cleaning in/around the cut line thoroughly really helps define and mark out where the saw should go but also having dust management in place (vacuum/fans etc) while cutting will keep the line visible.
Factor in saw blade widths and a bit of wastage when measuring. For instance, a 10mm saw blade will likely take out 10-20mm worth of timber. So, remember which side of the line you will cut to achieve the finished dimensions. - Technique Tips: Consider the finish of the cut, as it can impact the visual outcome of the project. Sanding the edges after cutting will help achieve a cleaner, more defined edge, and sanding or brushing the cut surface can add texture or smooth it off completely.

Additional Considerations
- Blade Choice: Regardless of the tool, ensure the blade is suitable for cutting thick, dense timber like that found in railway sleepers.
- Regular Maintenance: Keep your cutting tools well-maintained. This includes cleaning, sharpening, and occasionally replacing your cutting blades to ensure they are always ready for the job.
- Workspace: Having an easily accessible dedicated work area can keep things tidy, easier and safer.
- Waste Management: Plan for the disposal of treated wood cuttings, as these may need special handling to avoid environmental contamination. The residue in creosote can kill of grass or affect waterways for instance. Using unneeded off-cuts in other areas of the setting can be a great way to minimise wastage but also offer a bit more visual continuity onsite too.
Conclusion
Cutting railway sleepers can transform them into versatile, useful elements for various construction and landscaping projects. Whether you’re a hobbyist or a professional, it’s important to approach the task with the right tools, techniques, and safety measures. A well thought out design vision and thorough consultation process will ensure the correct sleeper is used, and materials are maximised to their amazing potential.

By following these guidelines, you can ensure that your projects are not only beautiful and functional but also completed in compliance with New Zealand’s safety standards.
Talk to us today about what sleepers are, and are not suitable for cutting or adapting, and what alternatives we can provide.